The Patina

patina ingredients


Now that the metalwork is all done (hooray!) it’s time to create the Patina. 

The original plan had been to paint an oxidised copper effect onto a steel structure but, if you remember, we don’t do things by halves around here, so the steel structure was skinned with real copper from recycled cylinders.  So now it’s big, and shiny, and … coppery. 

I wanted the colour of the Wave to represent the beautiful blues and greens of the sea, and, as it happens, copper develops a spectacular turquoise patina if left to the elements.  There are ways to speed up this process:  one of them is to urinate on the copper.  I thought maybe now that the Chief Fabricator and Welder of Distinction has completed his work with flourish, he could celebrate with a party.  A party involving a large keg of beer….. Do you see where I’m going with this?  But that would make the Sculpture a wee bit smelly, so the other option is cheap vinegar and salt.  Not a great deal better in the smell department, but less rude.

So after scrubbing, cleaning and polishing the copper to ensure all grease and muck is removed, I applied a generous coating of salt and vinegar to the copper surface.  Now the shed smells more like a chippie, as do I.  Time for a shower and a long wait to see if it works….. Watch this space.

Posted in Uncategorized | Leave a comment

The Mosaic Bit

wooden disc 2

While the Chief Fabricator is busy with the copper, I can concentrate on the mosaic feature of the sculpture.  The photo on the right shows the wooden disc which will house two mosaics, one on each side.  I have drilled holes in it to provide extra “clingability” (is that a word?) for the adhesive.

 planning mosaic

The next step is to plan the mosaic. I’ve used dark and light pebbles for contrast, and beach glass for added colour.  All collected from the Bay so very fitting! I arrange them on a sheet of paper exactly how they will be in the final mosaic.


mosaic adhesiveI apply a thick layer of adhesive over the surface of the wooden disc where the mosaic will go.  This is a slow drying adhesive so that I don’t have to rush so much.  Less stress!  I place each pebble and beach glass painstakingly into its correct place, making sure the adhesive doesn’t squish out between each piece, then leave the mosaic to dry overnight.  The next day I spray it with a thin film of clear acrylic so that the grout doesn’t sink in to the pores of the beach glass.mosaic laid


Once the acrylic film is dry, it’s time to grout! This is like icing a giant cake. Messy but fun!mosaic grout


I smear the grout thickly over the mosaic, making sure all the gaps are filled, then I begin wiping it off with a damp sponge.  This is a long process as the sponge quickly gets full of grout.  I’m so pleased with the end result – my weeks of practice have finally paid off!  Now I just have to do it all again on the other side!

mosaic final


Posted in Uncategorized | Leave a comment

A Huge Copper Learning Curve

welding copperMy Chief Fabricator has been busy in the Man Cave, covering the entire steel structure with a copper skin.  This has been challenging, exhausting, and involves a huge learning curve, but I’m amazed how much he’s achieved already, and it’s going to be beeee-autiful!

copper on steel

He started by doing some practice runs.  Small pieces of copper were welded to offcuts of steel.  The larger pieces proved more challenging – they get very HOT during the process and move around a lot.  I would love to help, but these things are best left to professionals, so I will stick to the mosaic bits…copper done on one side  One side of the wave has been completed, and it’s time for the Welder of Distinction to go back to flying his Jumbo for a few days, but we’re getting there.  It’s nail biting seeing it all take shape.  Remember, Art is a journey, not just a destination. Yes, the final piece is important but the process of getting there is the main thing.  A creative project begins with a passion, then an image or idea.  That idea is developed and given shape and structure.  The creation needs nurture and careful thought until it is finally released as the finished product.  Along the way we’re both learning so much, and there are many things we would do completely differently next time.  But that’s all part of the creative process.  Never stop learning!


Posted in Uncategorized | Leave a comment

Basic Wave Structure Done!

welding wave

The Welder of Distinction has been busy in his man-cave, welding the inner skeleton to hold the sides of the wave together.  The man-cave is alight with fireworks, smelly and rife with testosterone, so special protection is required when delivering cups of coffee.  I’d like to have a go at a weld myself tho….

wave structure

Et Voila! The 1200mm diameter 3D wave structure in all its mild steel glory.  You definitely don’t want this sucker rolling over your foot. Very heavy indeed.  The next task is to attach stainless steel rods which will eventually hold the inner mosaic section.  Watch this space…..

Posted in Uncategorized | Leave a comment

Copper!

SONY DSCcopper-patina-2-marcus-adkinsI love the effect of oxidised copper (known as a Patina) because it reminds me of the colours of the ocean.  It conjures up a Caribbean beach, an underwater wonderland and the spectaculars vistas of our own Jersey waters from a cliffpath on a sunny day….

Now, the original plan was to use paint to create this patina effect on the mild steel, but hey we don’t do things by halves around here, so look what I found at our local scrap merchant:copper cylinders

metal patchworkSo the plan is to open them up, lay them out, cut them up, and create a patchwork skin over the steel.  And what’s cool is that each section of copper will oxidise in its own special way to reveal a stunning effect.  That’s the plan anyway…!!

Posted in Uncategorized | Leave a comment

Work Gets Serious on the Wave

cutting template

Putting the mosaic practice to the side for a while, it’s time to get started on the main structure of the sculpture.  Once the template of the wave shape has been cut from hardboard it then needs final shaping to perfection….Most girls file their nails.  I file giant wooden waves.  Way more cool.plasma cutting wave


Now it’s time to start with the steel, and time to introduce my chief Fabricator and Welder of Distinction – Buter.  This picture shows him using a plasma cutter to shape one side of the wave from mild steel.  My vision is finally taking shape…..

Posted in Uncategorized | Leave a comment

The Fiddly Bit : Experimenting with Mosaic Techniques

beachglass
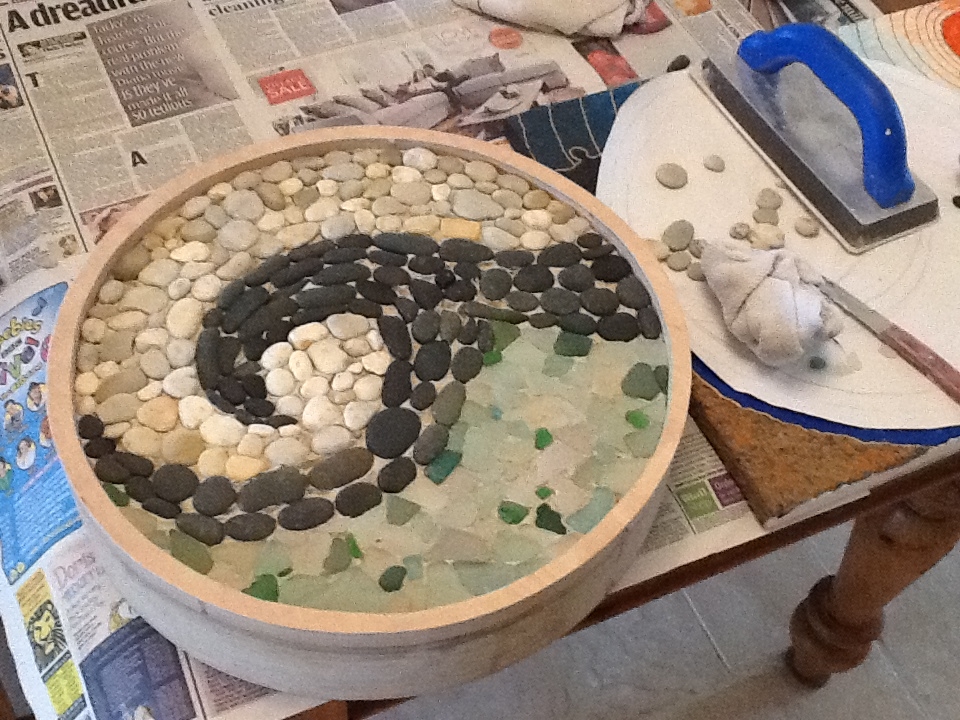
It’s blowing a hooley, but the sun is shining, so I wrap up the kids and dog and off we go to our favourite place: the beach.  The task in hand is to search for treasure.  With a trained eye, you’ll see it everywhere: smooth round pebbles and beautifully pummelled beach glass, of all colours. 

pebbles


Once the pieces have been collected and sorted, the next stage is to stick them onto the backing into the desired design.  I’ve been experimenting with different methods, with the help of my Trusted Tiler, Russ.  Now I have to leave them for 24 hours.  Then the fun starts: the Grouting!  Watch this space….

mosaicpractice

Posted in Uncategorized | Leave a comment

It Begins… The Template is Cut.

template3

Remember the old OHP? Before everything went all digital and fancy, we used these bulky bits of kit to project images onto the wall.  I drew a little version of the Wave onto something called a Transparency (a see-through plastic sheet) and the image is then projected onto a large piece of hardboard.  Here you can see me drawing a line over the projection.  The Wave is ready to be cut out….

20131012-184458.jpgSafety Goggles On! And no jokes about blondes with power tools please… The Wave is carefully cut out with a jig saw.  Et Voila!  The first template is now ready. 

Although the original plan was for a 1500mm Wave structure, we thought carefully about the location at the Hotel.  Now it can blow a bit of a hooley down there, and an alarming image sprung to mind of a giant metal wave rolling onto a passing car, so we reduced the size to 1200mm.  That will still look awesome and won’t hurt as much…

Posted in Uncategorized | 1 Comment

My Inspiration

When dreaming up a piece for the St Brelade’s Bay Hotel, I pondered on what the Bay means to me and my family:  We love the ocean – my husband was a commercial diver in the Gulf of Mexico oil fields; I taught scuba diving all over the world; the children enjoy splashing and jumping in the waves.  St Brelade’s Bay is our playground.  When the kids were tiny we lived in Rectory Cottage and a walk along the Bay was part of the daily routine.  Today we live up the hill and walk through Winston Churchill Park.  We’ve spent many hours wandering the sand in search of treasure – delicate shells, pummelled beach glass, strange pebbles, and interesting pieces of pottery.  The Bay is a paradise for locals and tourists alike.  With all of this in mind I created St Brelade’s Bay Wave.

sea-glass-2                 st-brelades-bay-towards-ousaine-jersey

Posted in Uncategorized | Tagged | Leave a comment

The Maquette

maquette

This is my winning maquette.  A maquette is a scale model of a sculpture, just in case you were wondering.  The actual thing will be quite a lot bigger.  I think I might need a bigger workshop…!

Posted in Uncategorized | 2 Comments